Forward fuselage bottom skins riveted

We did some exciting steps in the fuselage build - we finally mated the mid and forward fuselage assemblies together for good:

Mated forward and mid fuselage assemblies

To do that, we first attached the center section bulkheads with the appropriate spacers (later the wings attach at this location) and some huge (AN9) bolts:

Center section bulkheads attached and torqued

AN9 bolts that attach the fuselage parts (and later the wings)

Thanks to a hint from the interwebz, I knew that I had to rivet the one nutplate from section 44 that goes inbetween the center section bulkheads. Once the whole thing was assembled, it was clear why - it's very very hard to get to later:

Impossible nutplate (if I hadn't done it now...)

We then started riveting the skins and bulkheads together, with one of us on the floor and the other bucking from the top. This included some pretty tricky rivets, like this one:
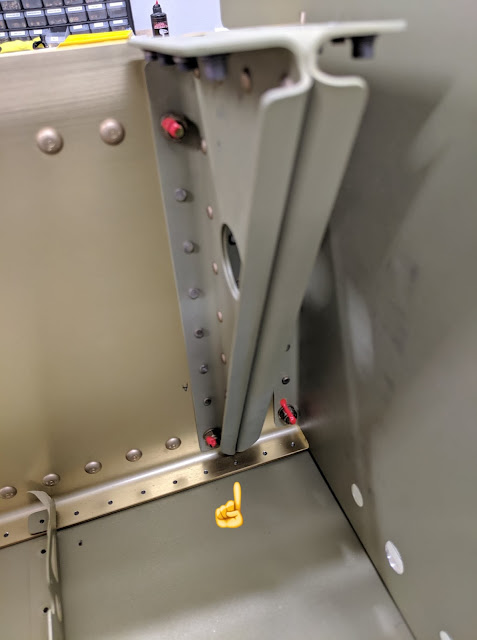
Very hard-to-reach hole that we needed to buck a rivet in

We had to use an indirect riveting technique to buck those (there were 6 of them):

Indirect riveting setup for bucking the rivet
which, to our own disbelief, gave pretty decent results:

Resulting rivet

With that, we finished riveting the center section bulkheads to the skins:

Forward center section bulkhead flange fully riveted

For the double-flush rivets that sit underneath the landing gear mount, we had to use a shorter rivet than Van's indicates (-3.5 instead of -4), but then they sat almost perfectly flush:

Double-flush rivets in forward center section bulkhead

With that done, I bolted and torqued all the seat assembly parts together:

Forward fuselage assembly bolted and torqued

Forward fuselage assembly bolted and torqued

I then clecoed the center section side plates in place (which was a small challenge in terms of alignment):

Assembled bottom fuselage (not yet fully riveted)

Only that part of the riveting remains to be done, along with some fitting/drilling of the landing gear mount. Like I mentioned before, I'm not finishing the parts that aren't used soon (like the seat floors), and instead leaving those for when they're needed.

Time lapse:


Total forward fuselage ribs and bottom skins rivets: 722
Total forward fuselage ribs and bottom skins time: 113.9h

Mid-fuselage bottom skins complete!

The one last step in this section is a very long one - basically "rivet the whole thing together", so we started doing that. First came the TAS antenna doubler, which I wanted to rivet before attaching the skin (I'll leave drilling the TAS antenna hole for later):

TAS antenna doubler riveted in place
Then we clecoed the skins and started riveting them to the ribs and bulkheads (except for the aft/side holes that are riveted when attaching the side skins or the tailcone). Since the skin is longer than the parts, we needed to improvise a jig to hold it while we riveted:

Size comparison: mid-fuselage parts onto jig vs almost-average-size human :)

Mid-fuselage bottom skins ready to rivet
We got to a good rate of about 2 rivets/minute, which means this still took many hours of work to do all 731 rivets, but gave us good results in the end:

Fully riveted mid-fuselage bottom skins

Fully riveted mid fuselage
With this, the mid fuselage section is complete and ready to attach to the forward fuselage.

Time lapse:


Total mid-fuselage ribs and bottom skins rivets: 1151
Total mid-fuselage ribs and bottom skins time: 99.5h

Forward fuselage ready to attach

We continued riveting the forward fuselage parts, which is now about bringing large parts together:

Firewall parts mated with the forward fuselage bottom skin and ribs

This involves using a layer of sealant between the firewall bulkhead and the bottom skin - I used the 3M Firebarrier 2000, as others before me have, for some added fire protection:

Firewall bulkhead clecoed with sealant to the forward bottom skin

Once the sealant cured, I riveted the parts together:

Firewall bulkhead riveted to the forward bottom skin
We proceeded to rivet the forward fuselage ribs to the bottom skin, which required some challenging positioning (or longer arms than my wife has), so we supported the firewall bulkhead in the right places for her to put her knees down on it:

Wife trying to find a good way to buck the rivets at the bottom flanges of the forward fuselage ribs
Wood supporting the firewall bulkhead to she could support her knees on it


and with that, got the whole thing riveted:

Fully riveted forward fuselage ribs (except the aft 4 holes)

The spacing between the forward fuselage rib and the forward fuselage bulkhead (per the previous post) worked out great and I riveted the parts together:

Forward fuselage bulkhead riveted to attach angle, with proper spacing to the nutplate

We then attached the floor ribs to the surrounding parts. Some pop rivets are used in the tighter area attaching the ribs together:

Inboard floor ribs riveted to forward fuselage bulkhead and firewall bulkhead

Finally, we attached the center section bulkhead, by bolting/torquing its web to the ribs then riveting them:

Forward fuselage parts attached to center section bulkhead

Special note goes to my newest accessory, rivet set caps - I thought this was silly, but the difference in the resulting rivet heads is blatant - even the coating of the heads was entirely preserved:

Rivets done with the caps (left row) vs rivets done without it (right 2 rows)

The next step is the big attachment - mating the forward fuselage to the mid fuselage. We're doing the two sections in parallel, so we now need to finish riveting the mid fuselage.

Time lapse:


Total forward fuselage ribs and bottom skin rivets: 578
Total forward fuselage ribs and bottom skin time: 101.1h