I continued working on the tailcone mods, and match-drilled the NACA valve brackets to the structure - this required a lot of fine-tuning to get the two brackets aligned properly, and the whole thing aligned with the vent flanges:
NACA valve bracket attachment to baggage bulkhead channel
I also match-drilled those brackets to the NACA valve itself, for #8 screws:
NACA valve match-drilled for screws to attach to its brackets
I match-drilled the lower avionics rails to the stiffeners (riveting these will be "fun"):
Avionics rails match-drilled to stiffeners
I finished the APU port by countersinking the hex post screw holes (for #6 screws - I should have made this out of .080" aluminum to use #8 screws safely) and the Camloc holes:
Finished APU port doubler
The assembled thing actually looks good:
APU port test assembly
APU port test assembly
I clecoed the doubler back behind the cutout:
APU port doubler test fit
then cut the matching cover plate from .025" aluminum, carefully grinded it down to the right size, and match-drilled the camloc holes into it:
APU port cover plate test fit
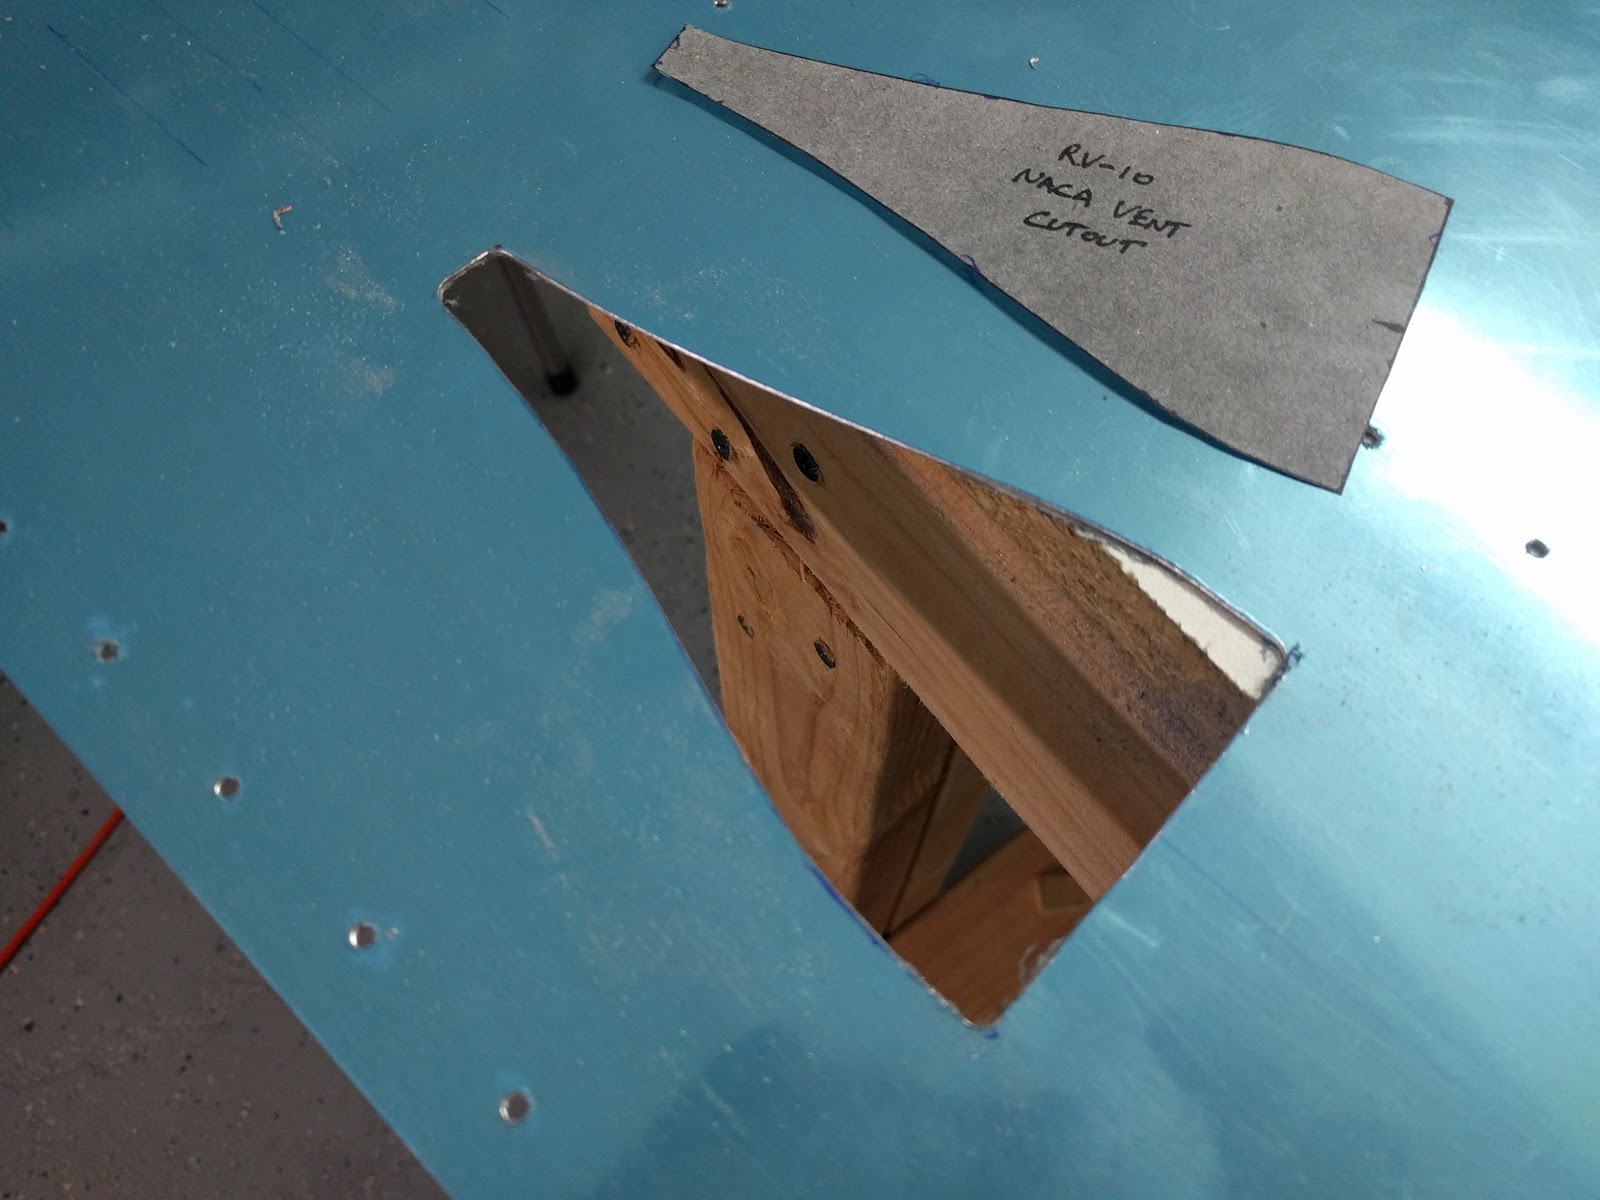
Also, using the template posted on VAF, I finally cut the NACA vent openings - first by drilling #30 holes near the corners, then expanding those to the layout edges with a step drill, and finally cutting the edges:
NACA vent outline
Cutting the NACA vent cutout with the dremel
NACA vent cutout done with my trusty Dremel
The result after deburring looks nice, and I'm proud of not having created a big random cut through my skin :)
Finished NACA vent cutout
I then started the loooong journey of deburring - thankfully the bulkheads were already deburred on their edges, but I still had to deburr their holes, plus all the holes and edges from the skins:
A LOT of holes to deburr
I still have a little bit of deburring to do (the edges of one of the side skins), but other than that everything's ready for primer, dimpling and riveting!
Time lapse:
Total tailcone time: 108h Total tailcone rivets: still 52
It's been almost a month since the last post, but I've been making slow and steady progress.
I finally started applying primer to the tailcone parts (as well as a few trim mount parts, which are officially in the "empennage attach" section) - a first session was enough for most of the small parts (plus a few of the stringers):
Primed tailcone parts
I countersunk the longerons:
Countersunk longeron
then started riveting - first the bellcrank:
Riveted bellcrank
then the bellcrank/battery mount:
Riveted bellcrank/battery mount
and then putting them together:
Bellcrank in its mount
I dimpled the parts that were primed and needed it:
Dimpled parts
then riveted them:
Riveted aft fuselage bulkhead
Mod: static line
I started executing the mods I previously posted about. I fabricated spacers to attach the static line's adel clamps with:
Test-fitting the spacers on spare J-channel
I made 4: 2 for the section where the tee lives, 1 for the forward section (since I'll also have the F-1048D bracket there), and 1 for a cable from the ELT to its antenna (assuming it'll be RG400, it's not flexible enough to have more than one attachment):
Static line and ELT cable clamp spacers attached to top stiffener
I made an L-bracket from .040 aluminum to hold the static line tee, which will be attached to the bulkhead with two AD4 rivets:
L-bracket for the static line tee
I match-drilled the L-bracket to the bulkhead, carefully selecting the height such that it matches the height of the adel clamps.
Mod: avionics shelf
I installed the rib for the left-side shelf:
AHRS kit support rib
I then realized that instead of adding a rail to the left side stiffener plus some bracket that would require fine-tuning to support the shelf at the proper angle, I can just install a second VA-260B rib exactly like the first:
Second rib for the avionics shelf
This sounded like a perfect idea, except for one minor detail - the hole separation on the outboard J-channel (which is part of the bottom skin) is not the same as that on the inboard J-channel, so the rib holes didn't line up:
Misaligned holes (ignore the plastic misalignment)
My solution was to drill the proper holes from the skin into the rib, which obviously leaves me with 8-shaped holes:
8-shaped holes on second avionics shelf rib
I drilled those up to #30 (so they don't get in the way of attaching the skins underneath), then drilled the real holes for attaching the rib inbetween those (I had just enough hole distance):
Enlarged and additional avionics shelf rib holes
Another minor detail was that I had to trim off the aft corner a little bit so it wouldn't hit the bulkhead:
Corner of the second avionics shelf ribs hits the bulkhead
Finally, I match-drilled those to the skins and bulkhead:
Second avionics shelf rib in place and match-drilled
Mod: wiring conduits
I added the Panduit conduit holders to the bulkheads and ribs:
Panduit conduit holders across the bellcrank ribs
Panduit conduit holders running all the way back
Mod: antenna doublers
I cut doublers for the transponder, UAT and ELT antennas from .040 aluminum, and also added a doubler to the aft section as a "just in case" for future antennas (since everyone says it's really painful to do later):
Aft doubler for future antennas
Mod: APU port
I also cut the doubler for the APU port out of .063 aluminum. To cut out the shape of the port, I used the drill press at work (they have a slightly better equipped workshop :) and it's for employees to use for personal projects) with the fly cutter:
Cutting the APU port round edges with the fly cutter
This gave me this shape:
Fly cutter holes for APU port
I then used the dremel to cut the straight sides and filed it down to a nice smooth edge, ending up with the "proper" shape:
Full shape of the APU port
I say "proper" because even though it looked perfect, the plug didn't fit initially:
APU port doesn't fit in hole
I really want it to fit (snugly) to help dampen vibration as well as to reduce the chance of the pins contacting the doubler or skin, so I used the fly cutter to increase the hole a little bit, then filed it down to get the last bits out (the connector is not exactly circular):
APU port now fits into doubler (and - no hands - it's a snug fit)
APU port in doubler hole
I cut the doubler from the sheet and pre-drilled 3/32" holes into 3 of its sides, then match-drilled it to the skin (using the existing holes for the remaining side):
APU port doubler match-drilled to skin
That is slightly offset from the position I had originally drawn on the skin, but that's not an issue. I started the skin cutout with the corners using a step-drill to 7/16", after marking the radius of the hex post screws as reference (so they're not caught between the doubler and the skin):
Drilling corners of APU port cutout
which gave me just the right clearance from the side skin underneath:
Clearance of APU port cutout corners
then cut the straight edges with the nibbler:
Cutting edges of the APU port cutout
I then installed the hex posts to mark their opposite holes:
APU port with hex posts on doubler
Mod: NACA vent and valve
As I prepared to attach the NACA valve using the F-1048D bracket, I realized that wasn't very firm, and would put a lot of stress on the stiffener with sideways vibration. I decided to instead attach it to both the stiffener and the baggage bulkhead channel, with angled brackets. I drew them on .063 aluminum:
NACA valve attachment bracket layout
then cut and bent it them:
NACA valve clamped to attachment brackets
After some size adjustment, I got a final attachment that looks firm on multiple axes, with the only downside of being very close to the vent flanges on the baggage bulkhead (so I'll need very short pieces of tubing to connect the valve to the flanges):
NACA Valve attachment to the baggage bulkhead channel
NACA Valve attachment to the baggage bulkhead channel and stiffener
NACA Valve positioned at the center of the tailcone
Next I'll finish deburring and applying primer to the parts, then start riveting the main tailcone structure.
Time lapse:
Total tailcone time: 92.1h Total tailcone rivets: 52